Anyway I toyed with this idea, and then dropped it. I didn't think anything new would be learned about Tracy's legacy. And frankly, I didn't know where to start, or what I'd do with what I created when finished. I mean, how big will this thing be, and where would I store it. I've got enough clutter in the basement.
Then I had the idea of creating my own original darkride scene. Obviously the appeal of this is doing something I designed, and not aping someones existing work.
I gave this some thought. Sketched a few ideas. Then I wondered how to do it, how much it would cost, and again, what to do with what I created when finished.
There would certainly be a steep learning curve. I've never built anything like this before. The mechanics of getting my scene to work would take some serious R&D, and building miniature the sets and figures would take time with plenty of trial and error. I eventually procrastinated long enough that I basically lost interest in doing it at all.
Wrapping up long winded intro, I finally came up with the idea to do something quickly, and on the cheap. This "spooky darkride show scene simulation experiment" (it just rolls off the tongue) was built pretty much entirely with stuff I had in the house, and was constructed in about 8 hours total spread out over a few days.
Hopefully this looks like it came out of a small amusement park's haunted house...
Postmortem: Behind the Scenes...
The only real pre-planning I did for this scene was drawing one sketch for the Frankenstein Monster.
I liked the idea of doing a Son of Frankenstein costume mixed with a I Was a Teenage Frankenstein look. I manged to get the Teenage Frankenstein, but didn't have the sewing skills or the fabric for a Son of Frankenstein costume. I settled on the bandages look because that was something easily doable.
I sculpted the head out some old air dry clay I bought years ago. The clay had become pretty dry, and hard to work with but I managed. I had some sculpting tools from a high school ceramics class that I wanted to use, but unfortunately I couldn't find them. I ended up using toothpicks and my fingers to sculpt with.
The body is made of scrap wood, wire and duct tape. If you notice I remade the legs. The originals were way too small.
Once dry I gave the face a black base coat. I thought the green florescent paint would really pop on the black, but the florescent spray paint was old and wasn't very opaque.
I did spend about $13 on fluorescent paint. I thought I was smart when I found this Puffy Paint Neon 12 Pack...
... but I didn't look very closely and notice that "& Bright" under the "Neon." Only 5 of the 12 colors fluoresced under black light, and I had to pick up a separate bottle of blue florescent paint. Later, I saw this company makes a glow-in-the-dark color 12 pack that I really wish I had used instead. I'm sure that set could have worked a lot better.
Also if anyone else reading this ever thought about using "Puffy Paint" like regular paint, well, it kinda works. As you can see above the paint is streaky and isn't very opaque when brushed around.
Now with the "work lights" on...
 |
| Show Lights On |
 |
| Work Lights On |
You can see how extra crappy everything looks with regular lights on. The black light hides many, many sins, and for that I'm very, very grateful.
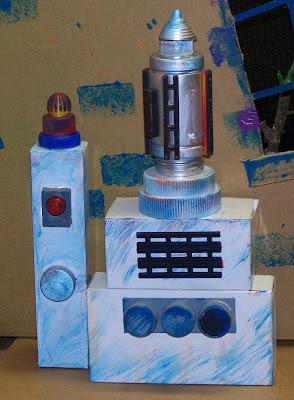
The lab machine are various food boxes I raided from my pantry. I spray painted them white, glued on some plastic junk, and then dry brushed them with the florescent paint. I was thinking the dry brush technique would make them look like old corroded metal. Mixed results on that idea. I put night lights in two of the boxes hoping to achieve a LITE-BRITE effect, but I don't think the tiny plastic "lights" I used really show up very well.
Another thing that didn't show up very well was the tree outside the window. The tree needed its own black light, and the strobe I was using for lightning should be brighter.
Here's a nice close-up of the Monster...
...and a side-view just for the heck of it.
Now since this thing basically didn't cost anything I can chuck the whole thing in the trash without any remorse. Well I'll hang on to the Frankenstein Monster for now, but the rest goes.


